SMTP (Simple Mail Transfer Protocol) is used when you set up an on-premises multi-function printer, scanner, fax, or line of business (LOB) application that needs to send email. If some or all of your mailboxes are in Office 365, there are a few options available: SMTP relay, client SMTP submission, or Direct Send.
SMTP Relay: An SMTP relay is used to send mail from your organization by authenticating the IP address or certificate of the sender. Any email address (including non-Office365 mailboxes) can send mail using an SMTP relay, as long as it uses a domain that’s set up as yours in Office 365.
Client SMTP Submission: Client SMTP submission allows your device or LOB application to send emails using an email address associated with an Office 365 mailbox by authenticating itself using that account. Each device can have their own sender address or all devices can use one address such as printer@yourdomain.com.
Direct Send: Direct Send can be used if the device or LOB application has the ability to send mail by itself. If so, the device or LOB application does not use Office 365 to send the mail, but the mail is received by Office 365 for delivery to your Office 365 accounts.
Take a closer look at collaboration, governance, security and compliance of your IT infrastructure
Requirement:
- Your on-premises domain must be added as an accepted domain in Office 365. For example, if the account you’re relaying from is email@yourdomain.com, you have to add netwoven.com as an accepted domain in Office 365.
- Your on-premises account must also be either an Exchange Online-licensed user in Office 365 or an alternative email address of an Exchange Online-licensed user. For example, if the account that you’re relaying from is sharepoint@yourdomain.com and you want to relay through email@yourdomain.com (an Office 365 user), you have to add sharepoint@yourdomain.com as an alternate email address to email@yourdomain.com.
- You also need a virtual SMTP server running in your domain to relay mail to office 365, authenticating itself as email@yourdomain.com
- You need an SMTP incoming connector in exchange online to allow direct submission method of SMTP mail delivery
Configuration Steps:
A. Configure Exchange Online to receive inbound Emails from other sources-
Obtain the public IP address you’re using on-premise. A dynamic IP address isn’t supported or allowed. You can share the IP with other devices and users, but you shouldn’t be sharing the IP with anyone outside of your company. Make note of this IP address for later.
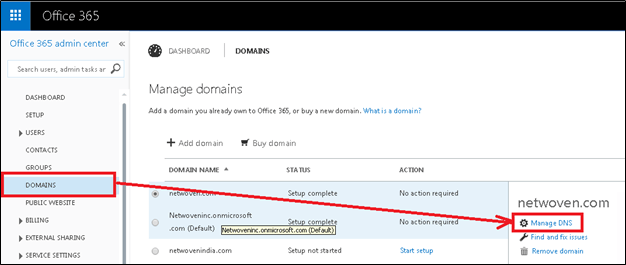
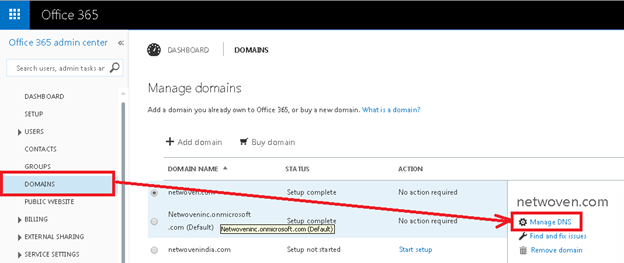
Log on to the Office 365 Portal.
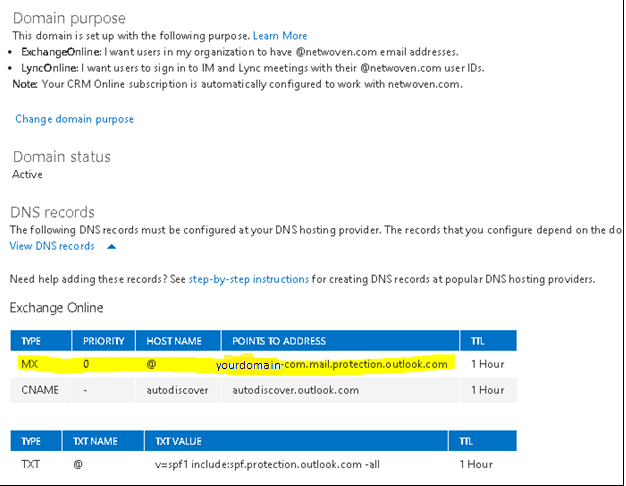
Select Domains. Highlight one of your domains and use the wizard to obtain your MX record. Or if you already have a verified domain, then goto Manage DNS to find the MX Record. The MX record will look similar to yourdomain-com.mail.protection.outlook.com. Make a note of the MX record for later.
Make certain that the domains that the application or device is sending as have been properly verified. If the domain is not verified, emails could be lost and you won’t be able to track them through Office 365 using Message Trace.
Goto Exchange Admin Console to create the SMTP connector. In the upper right, select Admin and then select Exchange from the drop down. 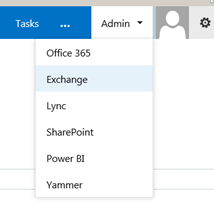
In the Exchange Admin Center, select Mail Flow > Connectors. 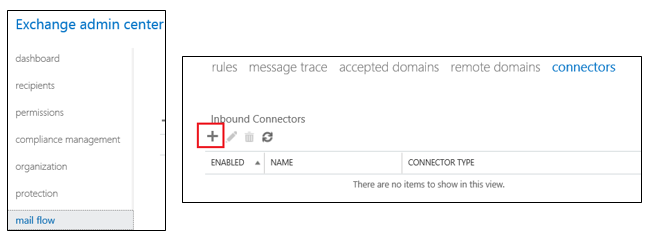
If no inbound connector exists, create one.
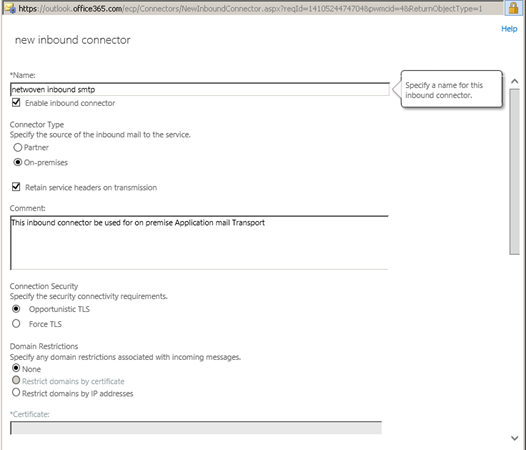
Give the connector a name.
Select On-Premises for the Connector Type.
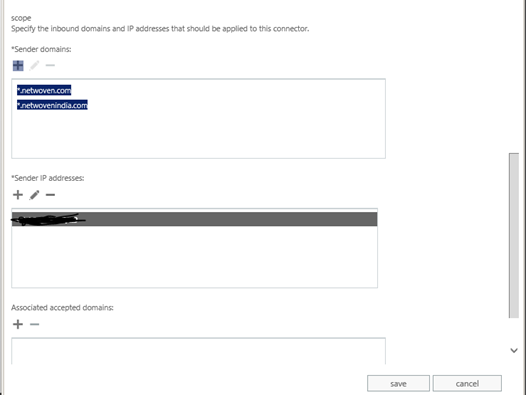
Under Domains, add a single asterisk (*). This will allow sending to any domain. Other values in this field will limit the domains that you can send mail to.
In the IP Addresses section, add the IP address from Step 1.
Leave all the other fields with their default values and select Save.
In the DNS for your domain, we suggest that you modify your SPF record to include the IP address from Step 1. The finished string should look similar to this: v=spf1 ip4:20.1.1.3 include:spf.protection.outlook.com ~all where 20.1.1.3 is your public IP address. Skipping this step could cause email to be sent to recipients’ junk mail folders.
In the device’s settings, specify a Smart Host value equal to the MX record value you recorded in Step 3.
Now its time to create an IIS SMTP proxy in on-premise to allow all application to send mails.
B. Set up Exchange Online as an SMTP Relay Using Windows Server 2012-
Install Internet Information Services (IIS)
- In Server Manager, select Add Roles.
- On the Before you begin page in the Add Roles Wizard, select Next.
- On the Select Installation Type page, select Role-based or Feature-based installation.
- On the Select destination server page, choose Select a server from the server pool, and select the server that will be running SMTP services. Select Next.
- On the Select Server Roles page, select Web Server (IIS), and then select Next. If a page that requests additional features is displayed, select Add Features and then select Next.
- On the Select Role Services page, make sure that Basic Authentication under Security is selected, and then select Next.
- On the Confirm Installation Steps page, select Install.
Install SMTP
- Open Server Manager and select Add Roles and Features.
- Select Server Selection and make sure that the server that will be running the SMTP server is selected and then select Features.
- On the Select Features screen, choose SMTP Server. You may be prompted to install additional components. If that’s the case, select Add Required Features and select Next.
- Select Install. After the installation is finished, you may have to start the SMTP service by using the Services snap-in for the Microsoft Management Console (MMC).
Set up SMTP
- Open Server Manager, select Tools, and then select Internet Information Services (IIS) 6.0.
- Expand the current server, right-click the SMTP Virtual Server, and then select Properties.
- On the General tab, select Advanced > Add.
- In the IP Address box, specify the address of the server that’s hosting the SMTP server.
- In the Port box, enter 587 and select OK.
- On the Access tab, do the following:
- Select Authentication and make sure that Anonymous Access is selected.
- Select Connection > Only the List Below and then specify the IP address of the server that’s hosting SMTP.
- Select Relay > Only the List Below and then specify the IP address of the server that’s hosting SMTP.
- On the Delivery tab, select Outbound Security, and then do the following:
- Select Basic Authentication.
- Enter the credentials of the Office 365 user who you want to use to relay SMTP mail.
- Select TLS Encryption.
- Select Outbound Connections and in the TCP Port box, enter 587 and select OK.
C. Set up Exchange Online as an SMTP Relay Using Windows Server 2008-
Install Internet Information Services (IIS)
- In Server Manager, select Add Roles.
- On the Before you begin page in the Add Roles Wizard, select Next.
- On the Select Server Roles page, select Web Server (IIS) and select Install.
- Select Next until you get to the Select Role Services page.
- In addition to what is already selected, make sure that ODBC Logging, IIS Metabase Compatibility, and IIS 6 Management Console are selected and then select Next.
- When you’re prompted to install IIS, select Install. You may need to restart the server after the installation is finished.
Install SMTP
- Open Server Manager and select Add Roles and Features.
- On the Select Features screen, choose SMTP Server. You may be prompted to install additional components. If that’s the case, select Add Required Features and select Next.
- Select Install. After the installation is finished, you may have to start the SMTP service by using the Services snap-in for the Microsoft Management Console (MMC).
Set up SMTP
- Select Start > Administrative Tools > Internet Information Services (IIS) 6.0.
- Expand the current server, right-click the SMTP Virtual Server, and then select Properties.
- On the General tab, select Advanced > Add.
- In the IP Address box, specify the address of the server that’s hosting the SMTP server.
- In the Port box, enter 587 and select OK.
- On the Access tab, do the following:
- Select Authentication and make sure that Anonymous Access is selected.
- Select Connection > Only the List Below and then specify the IP address of the server that’s hosting SMTP.
- Select Relay > Only the List Below and then specify the IP address of the server that’s hosting SMTP.
- On the Delivery tab, select Outbound Security, and then do the following:
- Select Basic Authentication.
- Enter the credentials of the Office 365 user who you want to use to relay SMTP mail.
- Select TLS Encryption.
- Select Outbound Connections and in the TCP Port box, enter 587 and select OK.
After creating the required setting for the IIS SMTP relay, we need to resolve additional issue that can be described as: Enable the IIS SMTP relay to send mail on behalf another Email address. For the demonstration purpose, let’s use the following scenario:
We want to enable two internal Hosts, to send email using the IIS SMTP server. One Host is a Sharepoint application that uses the Email address: sharepoint@yourdomain.com, and the other host is a TFS server that uses the use the email address: tfs@yourdomain.com.
In case that this Hosts trying to relay mail to the IIS SMTP server, that mail message will be rejected by the Exchange Online server because: by default, a recipient( in our example: email@yourdomain.com) cannot send email “on behalf” of other recipient’s ( in our example: sharepoint@yourdomain.com and tfs@yourdomain.com).
The good news is that we don’t need to create a user account and Mailbox that will “represent” these Hosts, who will relay mail to the IIS SMTP Server.
D. To enable the IIS SMTP server to send email to this Hosts, we can choose one of the following solutions-
- Using distribution group and assign “Send as permissions”
- Add additional Email address ( Alias)
1. Using Distribution group to allow email send by host with send as permissions.
This solution is based on creating a distribution group for each of the Hosts who needs to relay email to the IIS SMTP server. The distribution group will be configured as: security group (a SecurityDistribution group).
The next step is: assigning “Send as permission” for the recipient whom the IIS SMTP Server use for authentication (in our example: email@netwoveninc.onmicrosoft.com). The send as permission could be assigned by using the Web interface or by using a PowerShell command.
Assign “Send as permission” using the Office 365 management Web interface
- Log in to Office 365 portal, in the Admin menu choose the option: Exchange
- In the Exchange admin center choose the recipient menu –> groups
- Click on the “Add” option and choose the Security group option.
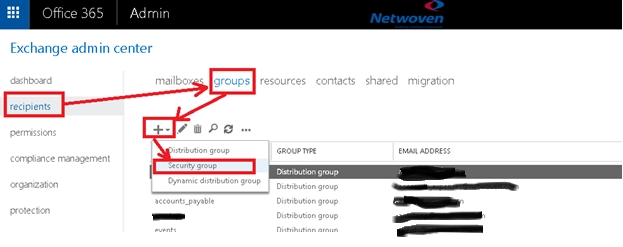
In our example, the new security-distribution group will be named as: SharePoint and TFS 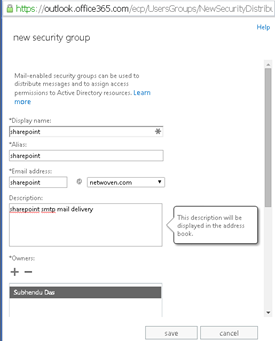
Double click on the name of the new security-distribution (sharepoint) and choose the menu – group delegation. 
Click on the add option and, add the recipient name that we use for the IIS SMTP credentials (in our example: email@netwoveninc.onmicrosoft.com). 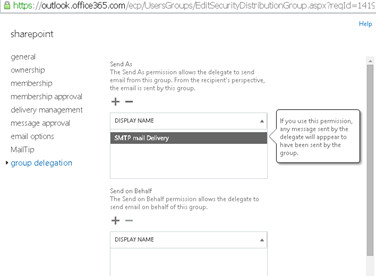
We will need to repeat this procedure, for each of the LAN Hosts that will need to relay email using the IIS SMTP Server.
Assign “Send as permission” using PowerShell command
- Assign “Send As” Permissions for a Mailbox/Distribution group
PowerShell command syntax: - Add-RecipientPermission -AccessRights SendAs -Trustee
Example:
Add-RecipientPermission sharepoint -AccessRights SendAs -Trustee postmaster
2. Add additional Email address ( Alias),
An additional option that we can use (instead of the securitydistribution group solution) is: add the email address that will be used by the LAN Mail enabled DevicesApplications as an additional email addresses (Alias) for the recipient who is used by the IIS SMTP Server.
In our example, we will add two additional email address to the recipient named: email@yourdomain.com.
- Log in to Office 365 portal, in the Admin menu choose the option: Exchange
- In the Exchange admin center choose the recipient menu –> mailboxes
- Choose the recipient name that is used by the IIS SMTP Server (in our example- postmaster).
E. Test SMTP email Delivery-
You can test SMTP relay services without using a separate LOB application or device.
To test SMTP relay services, use the following steps:
a) Create a text file using Notepad or another text editor. The file should contain the following code. Replace the source and destination email addresses with the addresses you will use to relay SMTP.
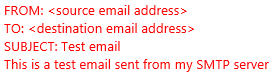
b) Save the text file as Email.txt.
c) Copy the Email.txt file into the following folder: C:InetPubMailRootPickup.
d) After a short time, the file should automatically be moved to the C:InetPubMailRootQueue folder. When the SMTP server delivers the mail, the file is automatically deleted from the local folder.
e) If the SMTP server can’t deliver the message, a non-delivery report (NDR) is created in theC:InetPubMailRootBadMail folder. You can use this NDR to diagnose delivery issues.


Nice blog right here! Additionally, your website a lot up fast! thank you so much! I did change one thing though. Instead of typing in that string in TerminalThanks again.
Highly descriptive blog, I liked that bit. Will there be
a part 2?
Thanks for your feedback. The O365 communication platform has evolved today into hybrid or Cloud oriented service and hence the scenario has changed a lot since this article was published. We are going to soon publish a new version of this article that supports today scenario of SMTP relay to office 365. Will alert you soon once the Part 2 is published.
Such a great article about smtp relay for office. This article is very informative for everyone. Thanks for Sharing.
I heard if you use legacy protocols such as SMTP or POP3 this can open the door for hackers to bypass any Multi Factor Authentication measures you may have in place.
Subhendu, great aricle. Thank you for taking the extensive time to share with the IT community.
You’ve listed three different methods: SMTP Relay, Client SMTP Submission, and Direct Send. Just so that I am clear, do I need to implement all of these configuration steps in your article for all three methods to work, ie – do some steps only apply to some or each of the three methods?
Again, great article. One that complements…
How to set up a multifunction device or application to send email using Office 365https://docs.microsoft.com/en-us/exchange/mail-flow-best-practices/how-to-set-up-a-multifunction-device-or-application-to-send-email-using-office-3.