Part 1: Embedding Content Pack in Web Page
The Microsoft Dynamics CRM content packs for Power BI allow you to easily visualize data in your Dynamics CRM Online or on-premises tenant.
The Sales Manager content pack focuses on sales related CRM entities such as Leads, Opportunities, Accounts etc. and analyzes sales performance through key metrics like Won and Lost Revenue, Sales Leaders, and Top Accounts.
Similarly the Service Manager content pack includes data from service CRM entities such as Cases, Queues, and Knowledge Articles.
You can deploy the content packs in Power BI service to show data from your Dynamics CRM online or on premises tenant, and customize the content packs to display custom fields or option set values you may have added to the CRM entities as part of your deployment.
This blog series explores some additional aspects of these content packs such as:
- Embedding dashboards and reports from the content packs in a page inside Dynamics CRM (or a custom application) to avoid navigating to the Power BI service at app.powerbi.com to view them. This is useful in scenarios where you need to filter data based on context (e.g. on an account page, display opportunities or activities for the account) or if you want to display the content pack using application’s identity when the users may not be signed into Azure AD.
- Enhance the content packs to security trim the data shown based on user’s permissions in the underlying Dynamics CRM system (e.g. display data to sales reps based on their territory or accounts), add featured questions and synonyms to support the Power BI natural language query functionality (Q&A), include additional CRM entities (such as Orders and Invoices) in the data model, and leverage some visualizations from the Power BI custom visuals gallery.
- Using Azure Machine Learning and R Services to support scenarios such as opportunity scoring, sales forecasting, and product cross-sell recommendations, and visualizing the scored results using new reports added to the content pack.
Embedding Content pack in web page
To embed a content pack report or dashboard into Dynamics CRM online or on-premises instance, we will use the Power BI JavaScript library. This library enables interacting with the Power BI REST APIs
to embed reports or dashboard tiles and control them programmatically to perform tasks such as filtering of data and control of page navigation.
(Note that the examples accompanying the JavaScript library use the Power BI Embedded service targeted for ISVs and is different from the Power BI service available to enterprise customers with Dynamics CRM subscription which is the focus of this article).
To authenticate users to the Power BI service, we will use the ADAL JS library.
This library facilitates authentication against Azure AD for JavaScript clients by enabling the OAuth 2.0 Implicit Grant Flow to acquire access tokens. This flow is used by JavaScript clients since they lack the capability to securely maintain a secret authorization code necessary in a classic OAuth flow.
Step 1 – Register your web app in Azure AD
Registering our web app in Azure Active Directory is necessary to identify the application to Azure AD and allow specifying the application’s permissions to Power BI REST resources. You can register the application manually in Azure Management Portal, but a convenient Power BI App registration tool is provided. Follow these steps:
In Step 1, choose Login and sign in with your Azure AD account.
In Step 2, specify the following values:
App Name: Specify name of your application such as Dynamics CRM Content Pack Integration.
App Type: Choose Server-side Web app
Redirect URL: This should be the URL within the web application that will contain the embedded report and request authentication. The Visual Studio project accompanying this article embeds the dashboard within the home page index.html, and for initial debugging the Redirect URL can be set to http://localhost:57220/index.html. Later, after deploying the embedding page to Dynamics CRM, we can add its final hosting URL to the application’s registration through Azure Management Portal.
Home Page: The home page or sign on page for the web app e.g. http://localhost:57220/index.html
Step 3: Select the Power BI APIs that the application will has access to. Select Read All Datasets, Read All Reports, Read All Dashboards, and Read All Groups. This will provide the app access to view all datasets and dashboards that the signed in user has access to. Users will still need to approve access (through the consent framework) when they use the app for the first time.
Click “Register App” button and save the generated client ID and secret for the application.
Next, we need to enable our web application for implicit grant flow. Sign into your Azure portal at portal.azure.com, navigate to Active Directory -> App Registrations and locate the newly registered application by its name (or its client ID generated on submission of the registration form). On the application’s tile, click on Manifest link (next to Settings), edit the application’s manifest to set the oauth2AllowImplicitFlow property to true, and save the change.
Step 2 – Create web app with an embedded report
Download the sample code accompanying this article to use as a starting point. Since the application only contains a single web page embedding a report from the content pack, we’ll steer away from using a SPA framework like AngularJS so as not to obscure our main focus of using ADAL and Power BI JavaScript libraries.
The Scripts/app.js file in the sample code contains the following application logic:
Create an ADAL AuthenticationContext object. This provides convenient methods to handle all the details of requesting tokens by crafting and parsing OAuth2 messages, maintaining state by caching tokens, and refreshing tokens as necessary. Later, we’ll invoke the login() method on this object to acquire an ID token containing user’s identity and the acquireToken() method to acquire an access token to invoke the Power BI REST APIs through a CORS request.
// Step 1: Create ADAL AuthenticationContext


window.config = {

instance: this.CONSTANTS.azureADUri,

tenant: this.CONSTANTS.tenant,

clientId: this.CONSTANTS.clientId,

postLogoutRedirectUri: window.location.origin,

cacheLocation: 'localStorage', // enable this for IE, as sessionStorage does not work for localhost

endpoints: {

powerBIUri: this.CONSTANTS.powerBIUri,

crmWebAPIUri: this.CONSTANTS.crmWebAPIUri

}

};

var authContext = new AuthenticationContext(config);
The configuration supplied to the AuthenticationContext constructor includes the client ID for the application (from the app registration in previous step) and your Azure AD tenant name (from your Azure AD in the format <tenantname>.onmicrosoft.com). Modify these values to reflect your environment.
this.CONSTANTS = {

clientId: '4d2878cc-a263-43f7-8d4b-14ef89967fec',

tenant: 'yourtenant.onmicrosoft.com',

azureADUri: 'https://login.microsoftonline.com',

powerBlUri: 'https://analysis.windows.net/powerbi/api',

REPORT_EMBED_URL: 'https://app.powerbi.com/reportEmbed?'

+ 'reportId=745624b3-0311-4025-95aa-e531c57ab1f8'

+ '&groupId=1d78bec1-6156-43fb-b9f9-04ccOec127b9',

crmWebAPIUri: 'https://yourtenant.api.crm.dynamics.com/api/data/v8.2'
Check and initiate login if the user is not logged in or the token need to be refreshed. If the user is currently signed into any service that relies on Azure AD (such as Office 365 or Dynamics 365), authentication context’s getCachedUser() method will retrieve the identity of the logged in user .
It’s also possible that the user may have signed in some time ago, and did not select the “Keep Me Signed In” checkbox. In this case, the token contained in the browser’s localStorage may have gone stale after a period of inactivity.
The getCachedToken() call is necessary to check if the user’s ID token is still valid. If either of these checks fails, we invoke the authentication context’s login() method to prompt the user to sign in again.
// Step 2: Ensure that user is logged in, and the token is valid

var user = authContext.getCachedUser();

var accessToken = authContext.getCachedToken(this.CONSTANTS.clientId);

if (!user || !accessToken) {

authContext.config.redirectUri = window.location.href;

authContext.login();

return;

} else {

console.log("User already logged in as '" + user.userName + "'");

}
The call to login() method will initiate the multi-step OAuth flow which ADAL conveniently handles for us. The user will be first redirected to Azure AD’s OAuth 2 endpoint such as
https://login.microsoftonline.com/<tenantname>/oauth2/authorize?response_type=id_token&client_id=<clientID>&redirect_uri=http%3A%2F%2Flocalhost%3A57220%2Findex.html&state=c68af9e5-fd48-4fd7-aa67-938b72e94501&client-request-id=2388c474-b913-49fd-a383-958fd31c43f7&x-client-SKU=Js&x-client-Ver=1.0.14&nonce=1273e8b1-33fb-4695-8522-d125dcf0be1d.Notice the request includes the app’s client ID and Azure AD tenant name we specified, a response type of id_token (applicable to implicit grant flow), and the redirectUri value of the application’s home page (where we need Azure AD to redirect to after the sign on process).
The user will be prompted to provide credentials and on successful sign on, the browser will be redirected back to the application home page with the ID token contained in the URL fragment. In this case the redirected URL will be similar to
http://localhost:57220/index.html#id_token=<JWTtoken>
To extract the ID token from the URL fragment and store it in browser’s localCache, we again leverage ADAL’s built in functionality. The authentication context ‘s isCallBack() method checks if the current location indicates a redirect from Azure AD after successful sign on, and if so, we issue a call to the handleWindowCallback() method to extract and store the token. Note that this check should occur before the calls to getCachedUser() and getCachedToken() above to avoid a never terminating loop.
// If this is a redirect from AAD after login, save the generated token and redirect to the application
var isCallback = authContext.isCallback(window.location.hash);
if (isCallback) {
authContext.handleWindowCallback();
var errMsg = authContext.getLoginError();
if (errMsg) {
console.log(errMsg);
} else {
window.location = authContext._getItem(authContext.CONSTANTS.STORAGE.LOGIN_REQUEST);
}
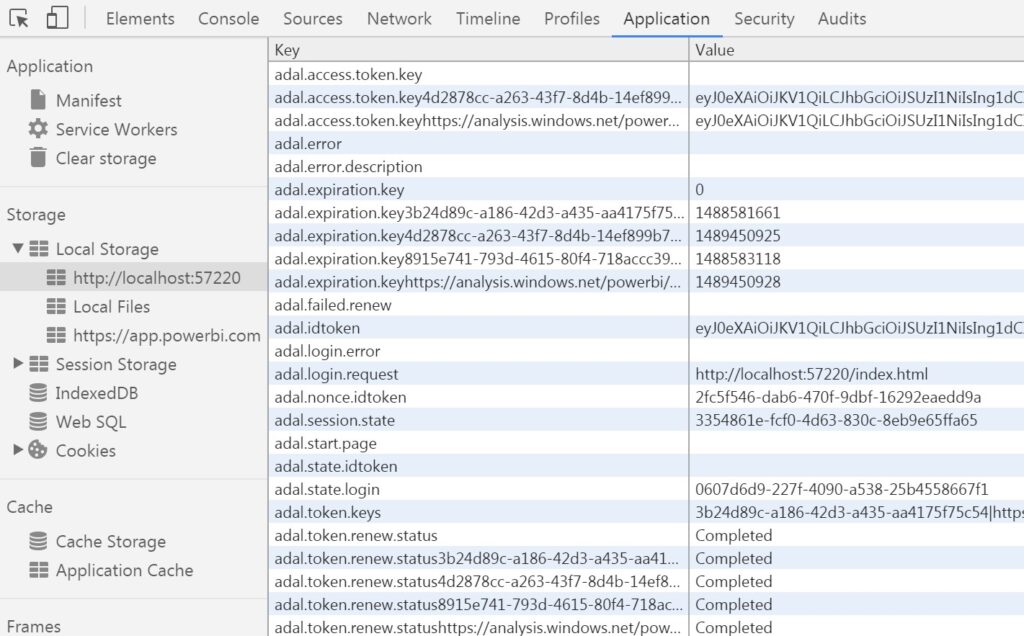
}At this stage, if you examine the browser’s localStorage in an F12 DeveloperTools window, it should contain the ID token obtained by ADAL JS library (along with other details such as the issuing AD and the token’s expiration date).
The user object returned by the getCachedUser() method also contains the profile details of the user (e.g. UPN). An important steps at this point would be to use the user’s authenticated identity to perform any necessary application authorizations.
- Acquire access token for Power BI REST APIs and perform CORS request. Once the user is authenticated, we need to obtain an access token to invoke Power BI REST APIs on behalf of the user to fetch a report or a dashboard tile. This can be done by invoking the ADAL authentication context’s acquireToken() method and specifying the Power BI API endpoint as the target resource. On successful callback from this method, we are ready to invoke the Power BI APIs. ADAL will handle the task of attaching the access token as a bearer token in the authorization header of every call we make to the API.
Examining the browser’s localStorage in an F12 DeveloperTools window should reveal the access token obtained by ADAL library.
function loadReport() {

// Acquire access token for calling the Power BI REST API, and embed report

authContext.acquireToken(this.CONSTANTS.powerBIUri, function (error, token) {

if (error || !token) {

console.log("ADAL error occurred while trying to acquire token: " + error);

return;

} else {

// Embed the report within its div container.

var powerBIConfig = {

type: 'report',

embedUrl: this.CONSTANTS.REPORT_EMBED_URL,

accessToken: token,

settings: {

filterPaneEnabled: true,

navContentPaneEnabled: true

},

filters: [{

target: {

table: "Date",

column: "Fiscal Month Year"

},

operator: "Contains",

values: ['201701', '201702', '201703']

}]

};

var report = powerbi.embed($reportContainer, powerBIConfig);// Invoke Power BI JavaScript API capabilities: handle embedding events,

// navigate to pages in the report or getting/setting report filters

report.off("loaded");

report.on("loaded", function () {

console.log("Report loaded");

report.getFilters().then(function (filters) {

console.log(filters);

});

var pages = [];

report.getPages().then(function (reportPages) {

console. log(reportPages);

reportPages[0].setActive();

});

});

}

});

};
To display a report in a div container we use the powerbi.embed() method provided by the Power BI JavaScript library. The configuration passed to this method includes the following. Access token for calling the Power BI REST APIs (obtained in the previous step)
- Type of object to embed (e.g. ‘report’ or ‘dashboard’)
- Embed URL identifying the object to embed. You can obtain the embed URLs for Power BI reports and dashboard by invoking the Power BI REST APIs using this tool or simply getting it from your Power BI workspace (select report, then File -> Embed in SharePoint online)
- Any filters to be passed in based on the context and user. In the above example, we set a filter for Fiscal Month of Jan/Feb/Mar 2017.
Understanding the Embed Process describes what actually happens when you call powerbi.embed(element, embedConfig). Once the report is loaded, any additional actions (such as setting active page in the report) can be scripted.
The next post will explore how to package this sample application to be displayed inside Microsoft Dynamics 365 for your CRM users.