

This part of the article is in continuation to my earlier article, in the first part, we have discussed the reasons about why we are exploring this option for the creation of single page app instead of making use of SPFx’s SPAP. Also, we discussed various advantages/disadvantages along with the precautionary note. In this part, we will jump into the actual development steps.
Let us begin with NodeJS
Step 1
Let us first install the react app utility using the below command from within Node JS command window
npm install -g create-react-app
Step 2
Then, let us create a new project using the command below. Choose any name of your choice such as sp-app
create-react-app sp-app –scripts-version=react-scripts-ts
It is important to note that the command above includes “–scripts-version=react-scripts-ts”. This is included in order to add typescript flavor to the mix so as to ensure that the development model we are choosing is aligned with the SPFx’s model’s requirement.
Step 3
Execute the below commands and start the app.
- cd sp-app
- npm start
Check this URL http://localhost:3000/ to see if it is working.
Step 4
Execute the command mentioned below to ensure that pnpjs libraries can be included.
npm install @pnp/logging @pnp/common @pnp/odata @pnp/sp –save
A little bit of work on SharePoint Designer
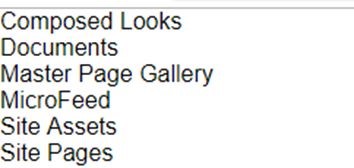
Now, let us make some work on a classical SharePoint page using SharePoint designer. When you open the site in SharePoint designer you will notice that the Site Pages is listed along with all the other resources in the side navigation,
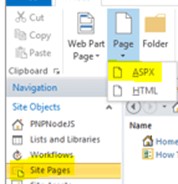
- Click on Site Pages library
- Inside the Site Pages library, you can create a new .ASPX page by clicking on the Page button and then selecting the ASPX option as shown in the image below.
- You can create the ASPX file with the name of your choice. For example, index.aspx
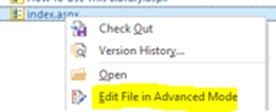
- Then you can open this newly created page by right clicking on the page and selecting the Edit file in Advanced Mode option.
Then, Copy the code snippet below and paste in to the index.aspx page within SP Designer
<!DOCTYPE html PUBLIC "-//W3C//DTD XHTML 1.0 Strict//EN" "http://www.w3.org/TR/xhtml1/DTD/xhtml1-strict.dtd"><%@ Page Language="C#" %><%@ Register tagprefix="SharePoint" namespace="Microsoft.SharePoint.WebControls" assembly="Microsoft.SharePoint, Version=15.0.0.0, Culture=neutral, PublicKeyToken=71e9bce111e9429c" %>
	<html dir="ltr"
	    xmlns="http://www.w3.org/1999/xhtml"
	    xmlns:mso="urn:schemas-microsoft-com:office:office"
	    xmlns:msdt="uuid:C2F41010-65B3-11d1-A29F-00AA00C14882">
	    <head runat="server">
	        <meta name="WebPartPageExpansion" content="full" />
	        <meta http-equiv="X-UA-Compatible" content="IE=10" />
	        <SharePoint:CssRegistration Name="default" runat="server"/>
	        <title>SPA In Sharepoint</title>
	    </head>
	    <body>
	        <div class="ms-Grid-row" id="root"></div>
	    </body>
	    <!-- Dependencies -->
	    <script type="text/javascript" src="http://localhost:3000/static/js/bundle.js"></script>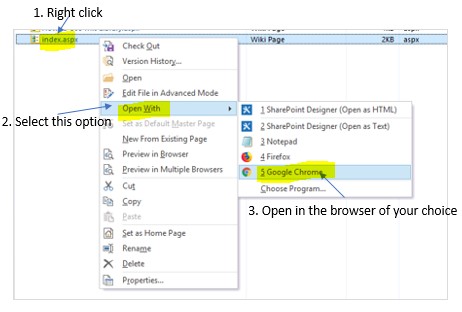
</html> - Follow the steps below to open this newly created page on a browser of your choice.
You should now be able to see the page similar to the below image.
As you might have noticed here the logo is missing, since it picks the logo from the relative URL this is just the initial setup to test if all is well
Some work in IDE (Visual Studio Code)
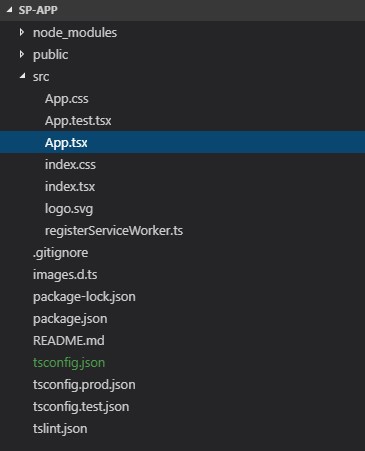
You are all set to open this project in any IDE of your choice, I like Visual Studio Code. Please verify if your folder structure is similar to the one shown in the below image.
The next step is to open the App.tsx file and then paste the below code as it is.
import * as React from 'react';
	import {
	    Web
	} from '@pnp/sp';

	class App extends React.Component < any, any > {
	        constructor(props: any) {
	            super(props);
	            this.state = {
	                lists: []
	            };
	        }
	        componentWillMount() {
	            const web = new Web(“Enter your Web URL as a string”)
	            const lists: any = [];
	            web.lists.get().then(Alllists => {
	                Alllists.forEach(function(list, index) {
	                    lists.push({
	                        key: index,
	                        title: list.Title
	                    });
	                })
	                this.setState({
	                    lists: lists
	                })
	            })
	        }
	        public render() {
	            return ( < div > {
	                    this.state.lists.map(list => < div > {
	                        list.title
	                    } < /div>)} < /div>);
	                }
	            }
	            export default App;
Understanding the Code & Final Step
Since this article is not a course on React, I am just highlighting the high-level diagnosis of the code. This code basically defines a React component in which
- We import the Web object from the pnp/sp library which exposes to all the methods and properties of the SharePoint Web object
- Then under “componentWillMount” function, the web object is created, using which all the lists within the SharePoint site are fetched and stored in the state variable lists of the type array.
- This state variable is then used to render the list title through the render method
Make sure to save the file “App.tsx” so as to compile the application. For any reason, if the application was stopped, then please run the command npm start from the console window of the Visual Studio Code or from the command prompt.
You can now browse to the index.aspx and ensure to log in using your O365/SharePoint credentials. You should see the page similar to below. Please note that we were able to fetch all the lists from the SharePoint site and display them.
We have made good progress so far and did the initial setup. We are also able to use the pnpjs library to and then communicate with the SharePoint REST API.
You can now take this forward and build the Single page application just similar to how this development is done using the general Node JS development.
We will extend this story and create a Single Page Layout using various UI frameworks in the next section


Great article. Question: Can a normal custom web part have an action the brings up a Single Part Application in another window? I have a situation where I want a SharePoint web part to look like a normal List web part but with a custom action that reads some data in a column and using that brings up a Single Part Application in a new tab.