

Simple SharePoint SPA with Example
So far, we have looked at the introduction in Part 1 and getting started in Part 2.
In this part of this article series we will go through the steps below,
- Create SPA layout using CSS Grid
- Create a simple React component which fetch all the lists from the SharePoint site within the selected context and will arrange them in the Left Navigation section.
- Click on the list name will display the records with title and IDs in a main section
Create SPA layout using CSS Grid
A Single Page Applications will typically consists of five sections as stated i.e. Header, LeftNavigation, Main Content,Right Navigation and then the footer. The challenge always has been to create a responsive layout. Fortunately, there are plenty of options available now. In this example, I am using the CSS grid .
In the IDE open the file App.css file and then replace the existing content with the CSS mark up as mentioned in the snippet below.
.header { grid-area: header; }
	.leftnav { grid-area: menu; }
	.main { grid-area: main; }
	.rightnav { grid-area: right; }
	.footer { grid-area: footer; }

	.grid-container {
	  display: grid;
	  grid-template-areas:
	    'header header header header header header'
	    'menu main main main main right'
	    'menu footer footer footer footer footer';
	  grid-template-columns: 200px 1fr 1fr 1fr 200px;
	  grid-template-rows:  50px 1fr auto;
	  grid-gap: 10px;
	  background-color: #2196F3;
	  padding: 10px;
	  min-height: 100vh;
	}

	.grid-container > div {
	  background-color: rgba(255, 255, 255, 0.8);
	  text-align: center;
	  padding: 20px 0;
	  font-size: 20px;
	}
Note
Explanation about how this works is out of scope of this article, please refer to some of the CSS grid training materials
Now, the next step is to make the adjustment in the App component. To do this, open the App.tsx file and then replace the existing content with the below code snippet.
import * as React from 'react'; import './App.css'; import { Web } from '@pnp/sp'; const web = new Web("https://yourtenant.sharepoint.com/sites/dev/"); class App extends React.Component < any, any > { constructor(props: any) { super(props); this.state = { lists: [], listItems: [] }; this._onClickHandler = this._onClickHandler.bind(this); } async _onClickHandler(e: React.MouseEvent < HTMLElement > ) { var listName = e.currentTarget.innerText; var lstResults = [{}]; const result = await web.lists.getByTitle(listName).items.get(); for (var i = 0; i < result.length; i++) { lstResults.push({ key: i, ID: result[i].Id, Title: result[i].Title }) } this.setState({ listItems: lstResults }); } componentWillMount() { const lists: any = []; web.lists.get().then(Alllists => { Alllists.forEach(function(list, index) { lists.push({ key: index, title: list.Title }); }) this.setState({ lists: lists }) }) } public render() { return ( <div className="grid-container"> <div className="header">Header</div> <div className="leftnav" style={{ textAlign: "left", paddingLeft: "10px" }} > {this.state.lists.map(list => <div > <a href="#" onClick={this._onClickHandler}>{list.title}</a> </div>)} </div> <div className="main"> {(this.state.listItems.length === 0) ? 'No Data' : <table> <tbody> <tr> <th>Title</th> <th>ID</th> </tr> {this.state.listItems.map(lstitems => <tr> <td> {lstitems.ID} </td> <td> {lstitems.Title} </td> </tr>)} </tbody> </table>} </div> <div className="rightnav">Right</div> <div className="footer">Footer</div> </div> ); } } export default App;
Since this is not an article about the React JS or CSS Grid, I will not explain the details about how the code works here. I will be looking forward to comments, if you need any explanation I will be happy to add here. Please note that this example has a very basic setup in terms of CSS and the coding.
Now, after saving both the files you can now run a command “npm start” again and then open the index.aspx file from the SharePoint. Now you should be able to see the page as shown in the image below.
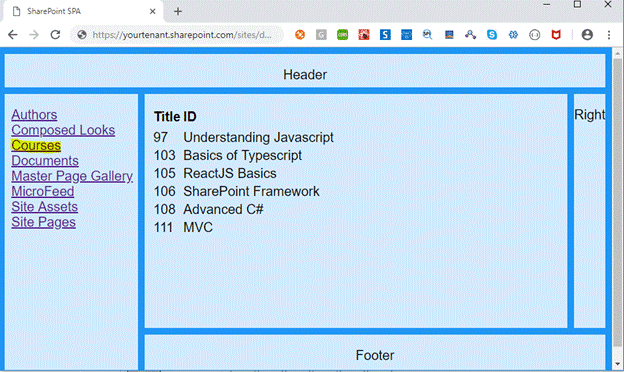
This is a simple example which sets up the initial template, As you can notice you can click on the name of the any list in the left navigation section and the page will immediately fetch all the records of the selected list and then displays the title and ID in the main section in a tabular format without refreshing the page.
Mentioned below are few of the noticeable references while preparing this article.
- Big Thanks to Patrick Rodgers for creating a pnpjs library.
- w3schools.com from where the CSS grid based layout snippet is used.
- Typescript-react-starter GitHub using which initial development setup was created
There is also a GitHub repository created by me, sp-spa-starter which you can clone or download and use it as a starter for your project.
Issues
You may experience few issues when you follow the steps above. Please perform below mentioned adjustment to couple of files before hitting npm start command.
open the tslint.js file from the root folder and then make adjustment as shown below:
{
	  "extends": [],
	  "defaultSeverity": "warning",
	  "linterOptions": {
	    "exclude": [
	      "config/**/*.js",
	      "node_modules/**/*.ts",
	      "coverage/lcov-report/*.js"
	    ]
	  }
	}
Open the tsconfig.json file under root folder and then add below line under the compiler option
"skipLibCheck": true I have also created a GitHub repository with this starter code, you can download or clone this starter kit from here and follow the instructions provided there to execute the project.


I’m interested if you plan to continue this series. There are some questions/issues that I have been trying to figure out best practices for when writing SPA’s in SharePoint/Office365.
1. How do you plan to deploy these apps? Right now you are using a bundle from your local host. This wouldn’t work in a production environment. Normally apps have folders and multiple modules and aren’t bundled in one js file.
2. How do you handle routing? If you have a number of pages (screens) in your app, how do you handle the fact that you user might press the back button to go to a previous screen? My biggest problem is extending the included navigation in a SharePoint site. It would be nice to add to the default navigation or somehow intercept a back button click.
3. This is for a classic page. Do you have any idea how it works in a modern page?