In this narrative, I wish to discuss the implementation of an example application customizer using webhooks. If you are dealing with SharePoint, you will need to use such artifacts more often these days. You will use application customizer to extend SharePoint user experience and coupled with webhooks it will free you up from a typical poll and wait for kind of server response scenario.
A webhook is a mechanism to inform about an “event reaction”, the philosophy being “You don’t need to call me, I’ll call you back if I have news”. That means, you don’t need to constantly poll the server. Therefore, webhook empower developers to subscribe to events(e.g. items are added, updated, etc. in a SharePoint list or document library). When an event is fired, SharePoint sends HTTP post payload to the registered subscriber. So, in a single word webhook is a user-defined HTTP call back. In this article I will particularly talk about how you can leverage the webhooks capabilities in order to display toast notifications in the frontend application.
Problem we are trying to solve
Consider a typical scenario. Say you are developing some application where you are queuing a user request from frontend to some backend API. Once you receive the response, you want to show some toaster message to the UI. In general the traditional backend API will take its time and will not return the data immediately. This is where a webhook comes into the picture. Implement a webhook and be informed about the event as it happens. It then notifies the frontend so that the user browsing the modern page at that time gets to see a toaster message on the page.
We will now design the solution of an aforesaid problem by leveraging the webhook.
Here are the design steps to follow.
- 1. User request is captured and posted to the backend.
- 2. The API doesn’t need to wait for the backend to respond, as the backend will take time to finish the job.
- 3. Let’s consider a custom list named “Alert Notification”, where we will register a custom webhook to capture the events. Backend job will add one item to this list indicating success or failure.
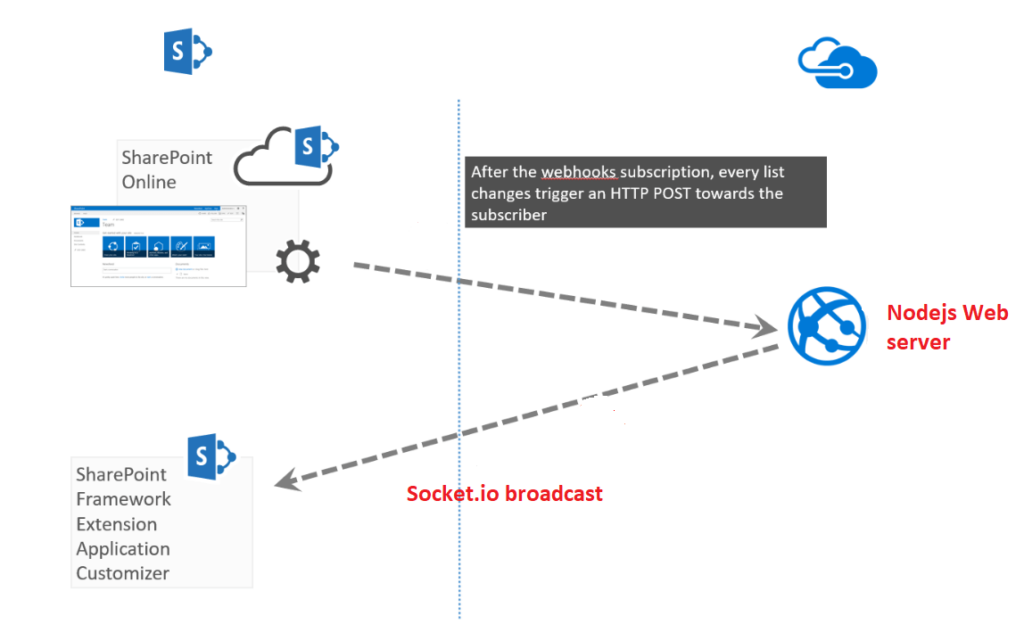
- 4. We will create a node.js application which acts like a webserver, this receives messages when the webhook is fired. This node.js application is a subscriber. Every list item addition will trigger an http post towards this subscriber.
- 5. Finally, we will create a simple SPFx application (aka client) that will communicate with the node web server via socket.io (a real time communication broadcaster) and displays the message to the UIs.
The design can be viewed as an architecture diagram as laid out below.
POST /_api/web/lists('5C77031A-9621-4DFC-BB5D-57803A94E91D')/subscriptions
Accept: application/json
Content-Type: application/json

{
  "resource": "https://contoso.sharepoint.com/_api/web/lists('5C77031A-9621-4DFC-BB5D-57803A94E91D')",
  "notificationUrl": "https://91e383a5.ngrok.io/api/webhook/handlerequest",
  "expirationDateTime": "2016-04-27T16:17:57+00:00"
}
In c# run the below code to register the webhook. You would need a NodeJS webserver hosted in azure which will act as notification URL. I have described that in the next section of the article.
string responseString = null;
           string notificationUrl = <Nodejs web server Url>;

            List lst = ctx.Web.Lists.GetByTitle(“Alert Notification”);
            ctx.Load(lst);
            ctx.ExecuteQuery();
            string accessToken = <get access token>;
            string listId = lst.EnsureProperty(l => l.Id).ToString();
            using (var httpClient = new HttpClient())
            {
                string requestUrl = String.Format("{0}/_api/web/lists('{1}')/subscriptions", siteUrl, listId);
                HttpRequestMessage request = new HttpRequestMessage(HttpMethod.Post, requestUrl);
                request.Headers.Accept.Add(new MediaTypeWithQualityHeaderValue("application/json"));
                request.Headers.Authorization = new AuthenticationHeaderValue("Bearer", accessToken);

                request.Content = new StringContent(JsonConvert.SerializeObject(
                   new SubscriptionModel()
                   {
                       Resource = String.Format("{0}/_api/web/lists('{1}')", siteUrl, listId.ToString()),
                       NotificationUrl = notificationUrl,
                       ExpirationDateTime = DateTime.Now.AddMonths(1).ToUniversalTime(),
                       ClientState = "A0A354EC-97D4-4D83-9DDB-144077ADB449"
                   }),
                   Encoding.UTF8, "application/json");

                HttpResponseMessage response = httpClient.SendAsync(request).Result;

                if (response.IsSuccessStatusCode)
                {
                    responseString = response.Content.ReadAsStringAsync().Result;
                }
            }
Once the subscription is added successfully, a 201 Created response is returned that includes the newly created subscription object.
Creating Node.JS Web Server
Next, we will create a simple node.js application which will act as a web server. The role of this app is to receive the message from webhook. The best way to host this application is in some cloud platforms. You can host this app in cloud providers like Azure, AWS, or google cloud platform if you want. But I have used azure here to host the app. Once the hosting is accomplished you will receive a URL which you can use as the notification URL in webhook registration.
Here is the complete index.js server code I used. When the web hook is fired in SharePoint, it posts the request to this node app, so pay attention to the post route block. In the highlighted code you will see that It is using socket.io to emit the list changes event.
This app has the following dependencies:
- 1. body-parser
- 2. express
- 3. moment
- 4. Socket.io
'use strict';
var port = process.env.PORT || 3000;
var app = require('express')();
var express = require('express');
var bodyParser = require("body-parser");
var server = require('http').Server(app);
var io = require('socket.io')(server);
var fs = require('fs');
var m = require('moment');
//debugger;
server.listen(port);
app.use(bodyParser.urlencoded({ extended: false }));
app.use(bodyParser.json());
app.use(express.static(__dirname));

// GET method route
app.get('/', function (req, res) {
    res.sendfile(__dirname + '/index.html');
});

// POST method route
app.post('/', function (req, res) {
    if (req.query && (req.query.validationToken || req.query.validationtoken)) {
        var token = req.query.validationToken | req.query.validationtoken;
        // Validating the webhooks subscription
        console.log('Found validation token: ', token);
        res.writeHead(200, { 'Content-Type': 'text/plain' });
        res.end(req.query.validationtoken);
    }
    else {
        if (typeof req.body.value !== "undefined" && req.body.value !== null) {
            // Getting the webhook and broadcasting it across Socket.IO to the client
            var data = JSON.stringify(req.body.value);
            console.log(JSON.stringify(req.body.value));
            io.emit('list:changes', data);
            const fileName = __dirname + '/webhooksLog.txt';
            // Keeping track of every webhooks
            // Write changes in a file
            fs.exists(fileName, (exists) => {
                let fileData = "";
                if (exists) {
                    fileData = fs.readFileSync(fileName, 'utf8');
                }
                let txtFile = "";
                txtFile += `<b>Retrieved</b>: ${m().toISOString()}</br>`;
                txtFile += JSON.stringify(data);
                fileData = txtFile + '</br></br>' + fileData;
                fs.writeFileSync(fileName, fileData, { encoding: 'utf8' });
            });
            res.writeHead(202);
            res.end(token);
        }
    }
});
Once done you need to publish this app to azure and let’s say you have the URL as
https://<whatever name you have chosen>.azurewebsites.netNow we will see how the app customizer communicates with this app in the next section.
Creating SPFx App Customizer
I am not going in details of how you can create a SPFX app customizer, there are tons of articles in web already which shows you how to do that. In this particular case let’s say you have created a SPFx simple application customizer. I would prefer to choose react as the frontend language while scaffolding projects through yeoman generator. Don’t worry I will provide all relevant dependencies used here later.In the onInit method we have created a method called connectSocket which will use socket.io to connect to the web server.ConnectSocket method takes previously created node server URL as input here.
@override
public onInit(): Promise<void> {
    this.context.placeholderProvider.changedEvent.add(this, this._renderPlaceHolders);
    this._connectSocket("<Previously created nodejs app hosted url>");
    return Promise.resolve();
}
Now let’s look at the ConnectSocket method. Socket here traps the list change event and calls another method getListChanges. Notification stays on the UI for 10 seconds before being removed by deleteNotification.
private async _connectSocket(socketServerUrl: string) {
    // Connect to the server
    const socket = io(socketServerUrl);
    // Add the socket io listeners
    socket.on('list:changes', (data) => {
        this._getListChanges(data).then((changes: any) => {
        if (changes) {
          let web = new Web(this.context.pageContext.web.absoluteUrl);
          // get a specific item by id
          web.lists.getById(changes[0].ListId).items.getById(changes[0].ItemId).get().then((item: any) => {
            console.log(item);
            this._lastQueryDate = moment();

            // Create the notification panel
            this._createNotification(item.Title, item.SPFxThumbnail.Url);

            // After x seconds the place holder is removed from the DOM
            let that = this;
            setTimeout(
              function () {
                // Delete the notification panel
                that._deleteNotification();
              }, 10000);
          });
        }
      });
    });
  }
getListChanges method
private async _getListChanges(dataWebhooks: any): Promise<any> {
    let dataParsed = JSON.parse(dataWebhooks);
    let resource = dataParsed[0].resource;
    let changeToken = `1;3;${resource};${this.toTicks(this._lastQueryDate)};-1`;
    let web = new Web(this.context.pageContext.web.absoluteUrl);
    let changes = await web.lists.getByTitle("Events").getChanges(
      {
        Add: true,
        Item: true,
        ChangeTokenStart: { StringValue: changeToken }
      });
   if (changes.length > 0) {
       return Promise.resolve(changes);
    }
    else {
      return Promise.resolve("");
    }
  }
  private toTicks(date: moment.Moment): number {
    return (date.valueOf() * 10000) + 621355968000000000;
  }
}
createNotification method
private _createNotification(title: string, link: string): void {
    if (this._topPlaceholder.domElement) {
      this._topPlaceholder.domElement.innerHTML = `
                    <div class="${styles.app}">
                      <div class="ms-bgColor-themeDark ms-fontColor-white ${styles.top}">
                        <i class="ms-Icon ms-Icon--Info" aria-hidden="true"></i>
                        ${escape(title)}
                        </br>
                        <a href="${link}">Click here for more detail</a>
                      </div>
                    </div>`;
    }
 }
deleteNotification method
private _deleteNotification(): void {
    if (this._topPlaceholder.domElement) {
      this._topPlaceholder.domElement.innerHTML = '';
    }
}
That’s it. Now you can run gulp bundle –ship and gulp solution-package –ship subsequently to generate packages and it’s ready to be deployed on app catalog.
Dependencies
And as promised here is the package.json dependencies so that you can see what packages have been used here.
"dependencies": {
    "@microsoft/decorators": "~1.3.4",
    "@microsoft/sp-application-base": "~1.3.4",
    "@microsoft/sp-core-library": "~1.3.4",
    "@microsoft/sp-dialog": "~1.3.4",
    "@types/webpack-env": ">=1.12.1 <1.14.0",
    "moment": "^2.19.1",
    "socket.io-client": "^2.0.4",
    "sp-pnp-js": "^3.0.1"
  },

  "devDependencies": {
    "@microsoft/sp-build-web": "~1.3.4",
    "@microsoft/sp-module-interfaces": "~1.3.4",
    "@microsoft/sp-webpart-workbench": "~1.3.4",
    "gulp": "~3.9.1",
    "@types/chai": ">=3.4.34 <3.6.0",
    "@types/mocha": ">=2.2.33 <2.6.0",
    "ajv": "~5.2.2"
  }
As you can see now, this post is meant for practitioners. The best way to truly understand a webhook is to try one. Web hooks are extremely useful and a resource-light way to handle event responses.
One consideration arises while using web hooks. It could be used simply as a notification mechanism, or it can carry data as its payload within its body. However, remember that web hooks are only a call back mechanism and meant to be light weight. One needs to carefully evaluate the usability of carrying a payload in a given context. Take your pick and experiment.