Azure DevOps by Microsoft is one of the leading tools used for automating the code builds, automation tests and deployment to the desired environment. It also helps us in maintaining the version of the code using the Repos, and Continuous Integration (CI) methodology is achieved by allowing the developers to check in the code into the shared repository, which in turn gets verified by automated test cases and build sequence. Continuous Deployment (CD) is achieved through Azure Release Pipelines where the build packages (output of CI) are deployed to different environments like Stage, UAT or Production. The changes deployed can include the build or any configuration changes, error fixes etc.
This blog is targeted to explain how to configure the CI/CD Pipeline. It is best demonstrated with an example of an azure function app deployment.
To begin with an assumption that the Function App has been created in the azure portal beforehand, only the code deployment is focused.
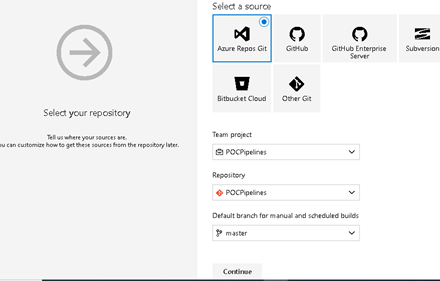
STEP 1: Create a code repository
This is my sample code repository in Azure DevOps. You can even go ahead with a git repo. Refer Create a new Git repo in your project – Azure Repos.

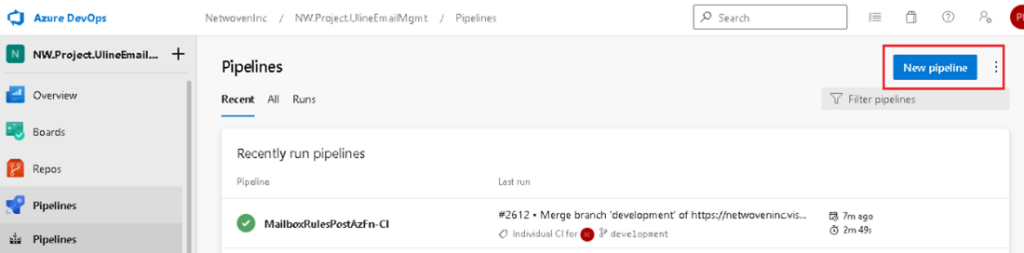
STEP 2: Create a Build Pipeline (CI)
To create a build pipeline, choose “Pipeline” from the Left menu and click on “New Pipeline” on the right as shown.
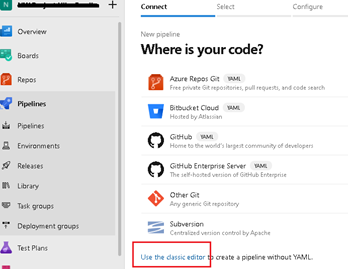
There are multiple options to choose from. I prefer the classic editor that gives a blank template.
Now choose the git branch; here we are using master. Choose an Empty Job.
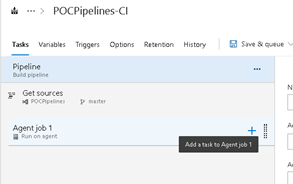
Below is a blank template, where we can choose our task, design our variables and triggers. To add a new task, click on the ‘+’ sign on Agent Job 1
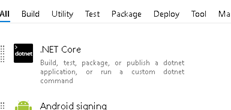
Quite a few task options are available like in the screenshot below:
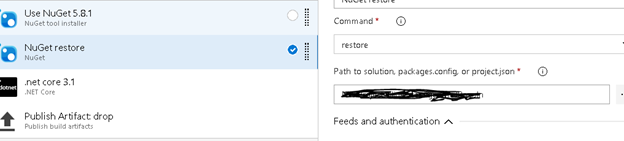
In this case, I have an Azure function project with .Net core runtime, so the appropriate build task would be the .Net Core option. However, before that I would need to restore my NuGet packages. Hence our pipeline looks like the one in the screenshot below. Here, sequentially we restore the packages and create a code build and then publish the artifact in a folder location internally managed by the DevOps for each individual pipeline.
We are using NuGet version 5.8.1
In the NuGet restore task point to the solution file (.sln) path
While configuring the .Net core build task mention the command as build and point to the function app project (.csproj). In the Arguments section, provide the folder name where the desired build output should be copied, here it is “ManagedMailBoxAzFn-publish”, and most importantly we should place this folder in the default staging directory of the pipeline i.e $(Build.ArtifactStagingDirectory)
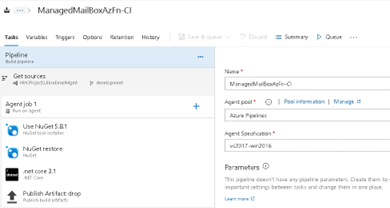
The next step is to publish the build artifact so that it is accessible to the CD pipeline i.e., release pipeline.
Our CI pipeline is completed.
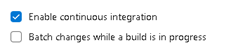
So, we can configure it to be a manual build, or a continuous build based on the selection of the below checkbox option

On every check-in of code, this Build Pipeline will be triggered, and a new build will be generated. We can add additional conditions as well, like a path or a scheduled time or any dependent builds etc.
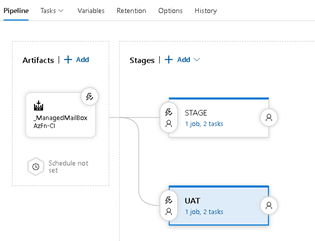
STEP 3: Create a Release Pipeline (CD)
Now let us create a Release pipeline for the above function app. The artifact as you see below is pointed to the CD build output artifact, which we created earlier. So, as soon as the build is created, the Stages are triggered, i.e the tasks to deploy the build to Stage and UAT environment. Let us deep dive into what these stages comprise of.
By clicking on add new stage you can choose any deployment tasks, here we have chosen “App Service Deploy” – to accomplish the zip deployment of the code, and “Azure App Service Settings” to deploy the function app configuration settings.

Below are the configurations for the App Service Deploy task.
The azure subscription must be chosen first, following which choose the appropriate Azure Function App which is created in the azure portal. The Package folder is same as the build pipeline published artifact path. So here, it is-
$(System.DefaultWorkingDirectory)/_ManagedMailBoxAzFn-CI/drop
In the Azure App Service Settings task, we can provide the app settings key value pairs in a json array format pointing to the same Function App.
Like how we did in the CI Pipeline, we can manage the trigger for deployment as well. So here, we have enabled the option to release, every time a new build is published as the artifact. We can even plug in an approval process for each stage.