Introduction:
Building a fortress around your company’s mission-critical data is the ultimate goal for any mild-mannered IT executive. But who is playing the role of bouncer at the access points to this very exclusive club?
Identity and Access Management (IAM) is the velvet rope that controls this access, and many vendors, including Okta, have done a good job of standing watch over IAM activities. But, as more companies consolidate their data and IT infrastructure into Microsoft’s heralded offerings such as Microsoft 365 and Azure, they have found it logical to consolidate their IAM needs within Microsoft as well.
According to Microsoft, the Identity Protection (IDP) tool allows organizations to accomplish three key tasks:
- Automate the detection and remediation of identity-based risks
- Investigate risks using data in the portal
- Export risk detection data to your SIEM
You can benefit from best-in-class protection in all three of these functions by utilizing Azure Active Directory (AAD). AAD is the Mr. and Mrs. Universe of IDPs, drawing upon 6.5 trillion signals per day from across Microsoft’s universe of products and services to identify and protect customers from threats.
This means that with AAD standing guard, you can benefit from real-time access decisions, and have this world-class data fed back into a security information and event management (SIEM) tool for further investigation based on your organization’s enforced policies.
And, with ServiceNow in place, switching from Okta to Azure Active Directory is quite easy to accomplish! Stay with us for a step-by-step primer on how to make the switch, and later, to go through and update the appropriate SAML settings.
Configuring ServiceNow
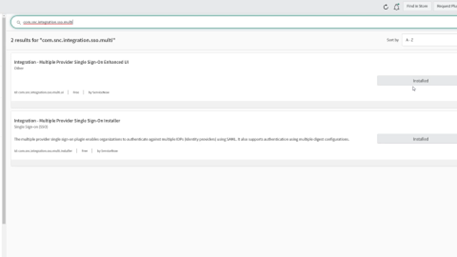
First, we are going into our ServiceNow portal, and we are going to go to the plugins section. Remember, we need to first make sure that the two SSO plugins are installed. The image above shows how this looks with SSO plugins installed.
Configuring User Forms
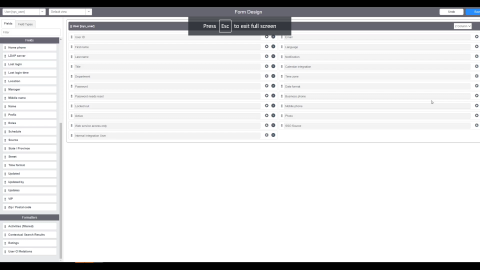
Next, let us configure our user forms, using Form Design. First, open any user – inside here, we will add the SSO field. Scroll down to do this (refer image above), and this will allow us to change the IDP provider and SSO provider per user. In a multi-IDP scenario, where you have Okta handling most of your users, and if you want to simply test out Azure AD, you want the ability to change your user at the user level. Click on ‘Save’ to complete the steps of adding the field.
Configuring Azure Active Directory
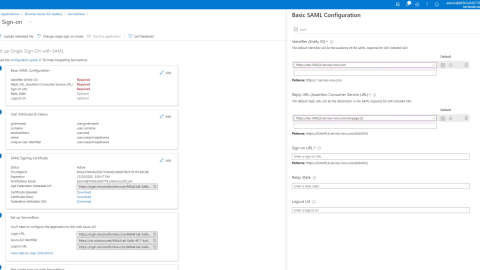
Now, let us configure AAD. Once we switch to AAD, we want to go to the section marked ‘Enterprise Applications’ and add a new application for Service Now (which is listed in the gallery), using the SAML token to configure single sign-on. Continue by setting up the base SAML configuration so the identifier that we want to use is the URL to our instance. (Click here to watch a video of this configuration, which includes elaborate details on this step).
Now, we will simply allow AAD to automatically set itself up, configuring the appropriate settings along the way to communicate with ServiceNow. Please note: If you are simply doing a test with a single user or subset of users, uncheck the box that would make AAD your default identity provider.
Final Steps
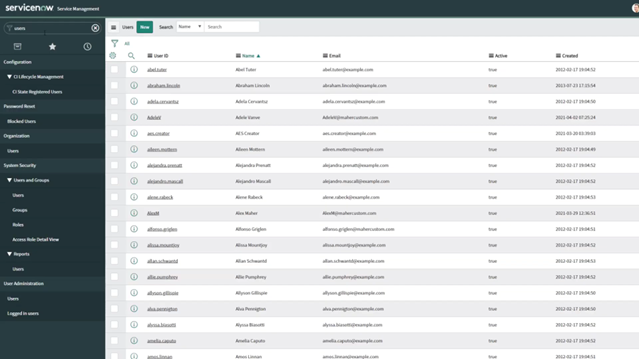
Now, back in ServiceNow, we can see (refer image above) the new Microsoft Azure federated single sign in. We can see that all the ServiceNow home pages reflect the change, and we even see the X509 certificate here. Finally, it is time to test the solution. Using the SIS ID from our identity provider, we will find one of our users, and update the SSO source column with SSO:[SIS ID number]. Then, it is back into Azure AD to assign a user to this application. Once in AAD, click on Users and Groups, then add the test user.
Now, click back into ServiceNow, and we can see we are redirected into ServiceNow as our test user.
Once you have tested this with a cross-section of users, it is time to simply choose the weekend to go live – or you can bring users over in a staggered, application-by-application process. In any event, Azure makes it extremely easy to complete this migration to one of the best IDP providers on the market!
“Please reach out to us if you have any questions or need assistance with this”.