
Introduction:
Adaptive card extension, also known as ACE, is a new feature of SPFx. An awesome adaptive card with a brilliant custom form in its quick view that saves data in a SharePoint list can easily be created using the SPFx adaptive card extension and PnP JS. In this first part of the 2-part blog series, we will see how to save data to the SharePoint list. After reading this blog, you will learn about-
- How to create an SPFx Adaptive card extension of type Image Card.
- How to display the current logged-in username on that card.
- How to add a button to that card.
- How to use state and props in ACE.
- How to display a form with a text field, a dropdown, and a date field in the Quick view.
- How to make the fields required and display error message if found blank on submit of the form.
- How to save the form data in a SharePoint list.
- And some bonus points at the end of the article.
So, let us begin. We will follow the following steps: –
- Create an SPFx Adaptive card extension project.
- Import packages.
- Create SharePoint service functions.
- Edit MyToDosAdaptiveCardExtension class
- Edit the card view.
- Edit the quick view to create a form.
- Create a SharePoint list to save data
- Implement the save and cancel functionalities
Prerequisite
This article assumes that the developer has-
- Node: 14.18.0
- SharePoint generator: 1.14.0
Create a SharePoint list to save data
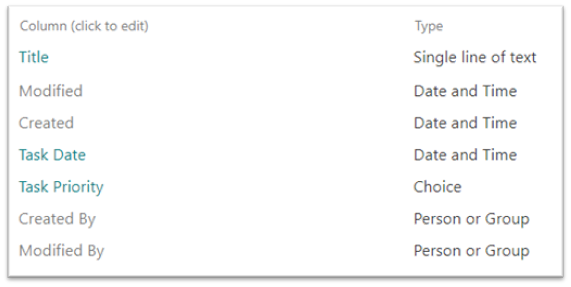
Create a SharePoint list with the name- ‘ToDoList’ and add a Date column with internal name ‘TaskDate’ and a choice column with the internal name ‘TaskPriority’ with 3 choices- High, Medium, and low.
Create an SPFx Adaptive card extension project
Step 1: Create a new directory for the project and change the current folder to that directory.
Step 2: Create a new project by running the Yeoman SharePoint Generator from within the new directory created for the project using the following command:
yo @microsoft/sharepoint

Step 3: Select the following options-
- Type of client-side component: Adaptive Card Extension
- Template: Image Card Template
- Extension name: MyToDos

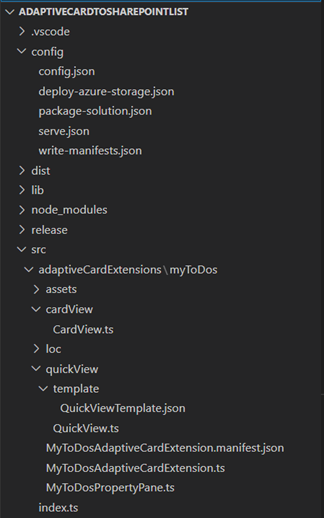
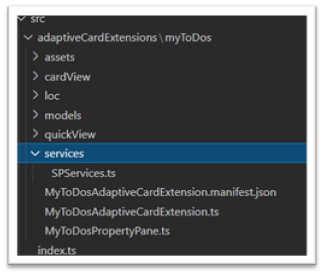
Now after the project is created, open it in VS Code. It will have the following structure
Open the serve.json file inside the config folder and update the initial page and set your site workbench page as the initial page as follows:
https://<demoTenant>.sharepoint.com/sites/<MyHome>/_layouts/workbench.aspxNow you can run the application using the following command to see the initial look
gulp serve
Import Packages
Import the following required packages:

Create SharePoint Service functions
Create a folder called services and SPServices.ts file inside it so that it matches the following structure-
Add the following code inside the SPServices.ts file-
import { sp } from "@pnp/sp";
import "@pnp/sp/profiles";
import "@pnp/sp/webs";
import "@pnp/sp/lists";
import "@pnp/sp/items";
import "@pnp/sp/fields";

export const getUserProfileInfo = (): Promise<any> => {
    return sp.profiles.myProperties.get();
};

export const addItemToList = (listname: string, item: any): Promise<any> => {
    return sp.web.lists.getByTitle(listname).items.add(item);
};

export const getListFieldChoices = (listname: string,fieldname: string): Promise<any> => {
    return sp.web.lists.getByTitle(listname).fields.getByInternalNameOrTitle(fieldname).select('Choices,ID').get();
};
Edit MyToDosAdaptiveCardExtension class
Go to the MyToDosAdaptiveCardExtension.ts file. Add following import statements
import { sp } from "@pnp/sp";
import { getListFieldChoices, getUserProfileInfo } from './services/SPServices';
Add the following code below the import statements:
export interface IUserInfo {
  name: string;
  jobTitle: string;
  pictureUrl: string;
  email: string;
}

export interface IOption {
  title: string;
  value: string;
}
Update the state and props interfaces as follows:
export interface IMyToDosAdaptiveCardExtensionProps {
  title: string;
}

export interface IMyToDosAdaptiveCardExtensionState {
  userInfo:IUserInfo;
  priorityOptions: IOption[];
}
Inside “onInit()” method write the following code before the return statement:
sp.setup({
      spfxContext: this.context
    });

    let userInfo: IUserInfo = {
      name: "",
      jobTitle: "",
      pictureUrl:"",
      email: "",
    };
    let priorityOptions: IOption[] = [];


    this.state = {
      userInfo,
      priorityOptions
    };

    getUserProfileInfo().then(resp=>{
      console.log("resp",resp);
      if(resp){
        userInfo.name = resp.DisplayName;
        userInfo.email = resp.Email;
        userInfo.jobTitle = resp.Title;
        userInfo.pictureUrl = resp.PictureUrl;
      }
      getListFieldChoices('ToDoList','Task Priority').then(choiceResp=>{
        console.log("choiceResp",choiceResp);
        if(choiceResp && choiceResp.Choices && choiceResp.Choices.length>0){
          priorityOptions = choiceResp.Choices.map(item=>{
            return {
              title: item,
              value: item
            };
          });
        }
      this.setState({
        userInfo,
        priorityOptions
       });
      }).catch(e=>console.log(e));
    }).catch(e=>console.log(e));
Edit the card view
Go to the CardView.ts and update the CardButton method as follows-:
public get cardButtons(): [ICardButton] | [ICardButton, ICardButton] | undefined {
    return [
      {
        title: "Add Todo",
        action: {
          type: 'QuickView',
          parameters: {
            view: QUICK_VIEW_REGISTRY_ID
          }
        }
      }
    ];
  }
Update the data method as follows-:
public get data(): IImageCardParameters {
    return {
      primaryText: "Hi "+this.state.userInfo.name + ", get ready with your ToDos!",
      imageUrl: require('../assets/ToDo.png'),
      title: this.properties.title
    };
  }
Edit the quick view to create a form
Go to the QuickViewTemplate.json and replace the existing code with the following code
{
  "type": "AdaptiveCard",
  "$schema": "http://adaptivecards.io/schemas/adaptive-card.json",
  "version": "1.3",
  "body": [
      {
          "type": "TextBlock",
          "size": "Medium",
          "weight": "Bolder",
          "text": "${title}"
      },
      {
          "type": "ColumnSet",
          "columns": [
              {
                  "type": "Column",
                  "items": [
                      {
                          "type": "Image",
                          "style": "Person",
                          "url": "${userInfo.pictureUrl}",
                          "size": "Small"
                      }
                  ],
                  "width": "auto"
              },
              {
                  "type": "Column",
                  "items": [
                      {
                          "type": "TextBlock",
                          "weight": "Bolder",
                          "text": "${userInfo.name}",
                          "wrap": true
                      },
                      {
                          "type": "TextBlock",
                          "spacing": "None",
                          "text": "${userInfo.jobTitle}",
                          "isSubtle": true,
                          "wrap": true
                      }
                  ],
                  "width": "stretch"
              }
          ]
      },
      {
          "type": "Input.Text",
          "id": "todoDesc",
          "label": "Task Title:",
          "isRequired": true,
          "placeholder": "Please enter task title",
          "errorMessage": "This field in required"
      },
      {
        "type": "Input.ChoiceSet",
        "id": "taskPriority",
        "choices": "${priorityOptions}",
        "placeholder": "Select task priority",
        "label": "Task Priority",
        "value": "",
        "isRequired": true,
        "errorMessage": "Please select task priority"
    },
      {
        "type": "Input.Date",
        "id": "taskDate",
        "label": "Task Date",
        "isRequired": true,
        "errorMessage": "This field in required"
      }
  ],
  "actions": [
      {
          "type": "Action.Submit",
          "title": "Save",
          "style": "positive",
          "data": {
            "id": "btn_save"
          }
      },
      {
          "type": "Action.Submit",
          "title": "Cancel",
          "associatedInputs": "none",
          "style":"destructive",
          "data": {
            "id": "btn_cancel"
          }
      }
  ]
}
Implement the save and cancel functionalities
Go to the QuickView.ts file and add the following import statement
import { IUserInfo, IOption } from '../MyToDosAdaptiveCardExtension';
import { addItemToList } from '../services/SPServices';
import * as moment from 'moment-timezone';
Update the IQuickViewData interface as follows
  export interface IQuickViewData {
    userInfo: IUserInfo;
    priorityOptions: IOption[];
    title: string;
  }
Update the data() method as follows
public get data(): IQuickViewData {
const { userInfo, priorityOptions } = this.state;
return {
userInfo
priorityOptions,
title: this.properties.title
};
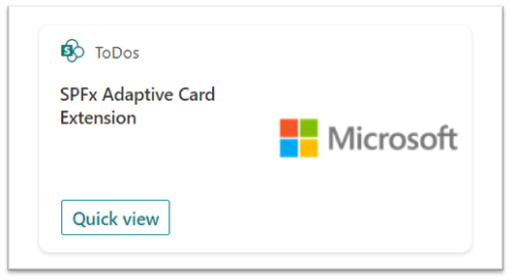
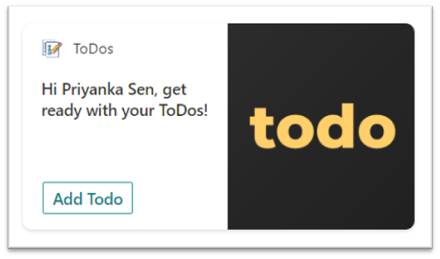
}If run the project at this point, the card should look like below:
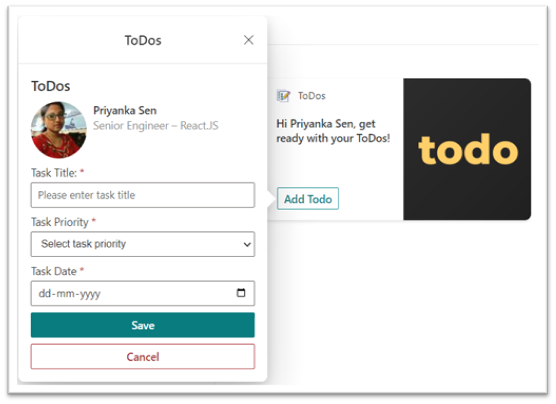
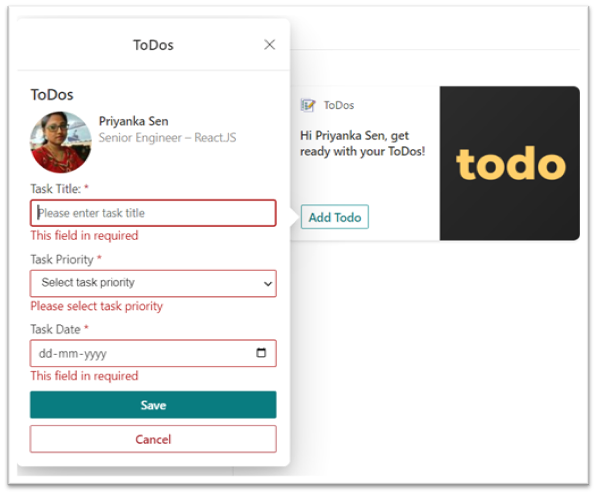
If we click the Add button, we can see the Quick view. And if we click the Save button without any input, the form will look as follows, even before implementing the Save functionality
Now let’s add the following code to add the Save functionality
public onAction(action: IActionArguments): void {
console.log("action",action);
const { id, todoDesc, taskPriority, taskDate } = action["data"];
if (action["type"] === 'Submit') {
if (id === 'btn_save') {
let taskInfo = {
Title:todoDesc,
TaskPriority:taskPriority,
TaskDate:moment(taskDate).format("MM/DD/YYYY hh:mm:ss A"),
};
console.log(`taskInfo `,taskInfo);
addItemToList('ToDoList',taskInfo).then(resp=>{
console.log("resp ",resp);
this.quickViewNavigator.close();
}).catch(e=>{
console.log("error ",e);
this.quickViewNavigator.close();
});
} else if (id === 'btn_cancel') {
this.quickViewNavigator.close();
}
}
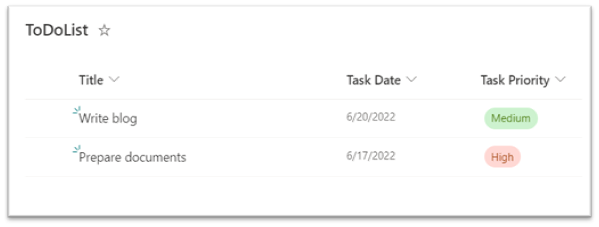
}Now run the code and test by adding a task title and date. Then check the SharePoint list. You can see the data added to the list.
Bonus Points
- Update the card image by adding any image in the Assets folder and updating the value of imageUrl key in the data() method in the CardView.ts file as follows-
imageUrl: require('../assets/ToDo.png'),- Update the icon in the card by adding the following method in the MyToDosAdaptiveCardExtension class-
protected get iconProperty(): string {
return require('./assets/ToDo3.png');
   }
Conclusion:
So far, we have learned to create an SPFx adaptive card extension that displays current users’ information and a form with some fields in the quick view to take user inputs. We have also learned how to save users’ inputs to a SharePoint list. Hope this article can help you to start with ACE. In Part 2 of this blog series, we will see how to display the list of items fetched from SharePoint list in Adaptive Card Quick View.
We hope you found this blog useful in understanding how to save data from the Viva connection adaptive card to SharePoint list using SPFx Adaptive Card Extension. Please reach out to us so that we can put our decades of Microsoft technologies experience and capabilities to work for your organization’s Digital Transformation